Pages

Sunday, 29 December 2013

Number 50!


This year I set out to do 50 artful new things - roughly one per week. It's not always been easy but it has pushed me out of my comfort zone and given me a huge incentive to be more creative.

Whilst this week's offering is not strictly new, I have tried to be more adventurous.  I've been teaching my friends how to make devore scarves but never found time to make one myself.  In a last minute panic to find a special present (think 21st December) I borrowed a design of chilli peppers from my eldest daughter's A-level art project and got printing.

Working on silk-viscose velvet, I wanted the chilli peppers to appear in relief which meant burning away most of the viscose pile.  It dramatically altered the drape and handle of the fabric, changing it to a light and gauzy cloth.  I used an acid dye to colour the silk background whilst leaving the viscose relatively pale, giving a shimmer to the chilli peppers. 

I finished in the nick of time (final iron on Christmas Eve!) but it was much admired and I know it will be treasured.  I have vowed to me more dramatic  with my use of  devore paste in the future but hopefully not quite as last minute.

50:50 project complete :) 
Tuesday, 17 December 2013

Are you sitting comfortably?


Are you sitting comfortably?.......then I'll begin......

Here is the story of a tired old chair made in about 1950.  It was covered in a beige moquette fabric patterned with red stars. Some time in the early 80's it was rescued from a junk shop and given a new cover of Sanderson William Morris print fabric by my mother. It came to University with me, comforted my friends and supported me as I revised for exams. It has survived 6 house moves but for the last few years it has languished in a corner of my daughter's bedroom looking very sorry for itself.

Over the last six weeks I have stripped off some rather unattractive varnish and restored the lovely beech wood frame with oil.  I've repaired the springs and reupholstered the seat back.  A new cushion pad was needed to replace the crumbling foam and with it a new cover, complete with piped seams.  

I have dyed and printed the fabric and embellished it with some favourite pieces from my stash.  Without being too dramatic, this is my family tree to pass on to my children.  Just sit quietly in it and listen to the stories it has to tell.

Sunday, 8 December 2013

Christmas Cheer


My favourite memories of childhood Christmas is making decorations for the house. It's still the nicest way to get in the mood for the festive season -  much more so than the angst of buying presents or the chore of writing cards.

A group of friends have been meeting in early December to share a meal and make something new for Christmas. We have been overly ambitious of late and there are several UFOs lying around our work baskets!  This time we wanted a less complicated task and so I came up with these wire tree decorations. Simple but effective and made fabulous with a selection of trinkets from Yum Yum Beads in Leeds. 

Monday, 2 December 2013

Stitching memories


With only two more sessions of my vintage upholstery course left, I am channeling all my energy into finishing my chair. I learned how to make piped seams, practising on some kitchen chair pads because the plain fabric I have chosen will not forgive any mistakes!

I've made a start on embellishing the back cover.  I'm adding small scraps using a machine appliqué technique.  The fabrics each have their own story to tell:  a piece of lace rescued from my Grand-mother's stash, silk brought back from a holiday in Thailand, some of the William Morris print that had been used to cover the chair by my Mother, wool tweed woven in Yorkshire.  

The wood has been brought to life with several coats of Danish oil and has now taken on a sensuous quality.  Again this is a slow process as each coat takes 24 hours to dry.  

I will look forward to sitting on my newly covered chair very soon! 

Sunday, 24 November 2013

Colour/Discolour


When you buy a piece of fabric do you really think about what you have bought?  I choose by colour, by pattern or simply by the feel of the cloth but little else crosses my mind except what I'm going to make with it.  So it's come as quite a surprise that when you do all these processes yourself it's actually very time-consuming.

I'm reupholstering an old chair, one my mother bought from a junk shop and re-covered for me about 30 years ago.  It's a sentimental project with more than a passing nod to my ancestry in the furniture business.  I wanted to truly personalise the chair and what better way to do it than with fabric I had printed myself?  

Once I had settled on a colour (at least two weeks agonising over that) I then spent several hours dyeing a couple of metres of linen union.  Having spent all that time colouring I then proceeded to apply discharge paste to bleach out a pattern. Then it all had to be washed again.  It's taken around 6 hours so far and that's not including drying time.  It would have been so much easier to buy some lovely fabric off the shelf but not nearly as satisfying.  

There's more work to do before the fabric makes it onto the chair but that will have to wait until next week.

Sunday, 17 November 2013

Getting ready


I'm making preparations for a Christmas workshop in a couple of weeks time.  My plan was to use coloured copper wire and glass beads.  The only trouble is that the ideas in my head don't quite match what I can create. 

The most elegant way to make this little star would be to use a single piece of wire but as I have discovered this takes careful planning and lots of thinking ahead.  How many beads to thread at a time, where to make the first twist of wire, how many twists, what size of bead?  I might moan a bit but this is probably what I love most about new projects.  I like testing out my ideas and finding the best solution to a problem.

Whilst this was quite nice to mess around with myself, it's not something that would translate well for a workshop so I've decided that my little star will be one of a kind. I'm afraid it's back to the drawing board for me.


Sunday, 10 November 2013

Making time


It's not always easy to find time in our busy lives for art, but this week I went to the first meeting of a local art group.

I was surprised to find so many people there and when the initial nervous buzz of chatter has died down, a quiet calm descended on the room as a dozen or so folk started to sketch the still life compositions that had been set up for us.  As we got a bit more confident we started talking with our neighbours about our choice of media or what we were planning to do with our initial sketches.

We are all amateurs, with no airs or pretensions and yet we come together to draw and sketch.  We plan to meet to meet once a month, sharing ideas, discussing our work and maybe inviting a tutor to give a workshop on a particular technique.  Making time to do something we enjoy.

Sunday, 3 November 2013

Pastel pumpkin


With lots going on this week, there hasn't been much time for art. I've consoled myself with a quick sketch of one of the seasonal orange fruits that are so abundant. I used my pastel pencils, building up layers of colour and shading.  It's a messy process but quite satisfying as you get the feel of the curves and contours of the pumpkin when you blend the pastels. 

Tuesday, 29 October 2013

Inspiration


Last week I went to see Cloth and Memory 2 at Salt's Mill with my namesake and kindred spirit, Claire.  The exhibition is on a truly monumental scale and is staged in the old spinning shed at the mill.  The work was all meritorious but the pieces that were most eloquent were the ones that had been created in direct response to the Mill itself.

It got me thinking about how I could develop one of my recent themes, the work of women social reformers from the Victorian era.  I've already made two pieces inspired by lace from the Gawthorpe Hall collection and I've got an idea for at least one item if not more.  I want to continue to work with fine and translucent fabrics and inspiration came in the early hours of the morning - somewhere between waking and sleeping.  later that morning I started sampling with some cotton organdie sandwiched between two layers of fine net.  I stitched the fabrics together using silk yarn and a mixture of random patterns, text and drawing with thread.  Then I applied devore paste (rather too clumsily, I confess) and burnt out the cotton.  The resultant fabric was crude but had potential.  Using screens to print the devore paste will ensure a lighter touch and clear images.  The stitching needs to be denser to capture the fragments of cotton organdie.

Here are the seeds for a new projects.

Sunday, 20 October 2013

Grey days


So much for the season of mist and mellow fruitfulness! The last few days have been characterised by thick fog which hardly any daylight can penetrate.

My morning walks often take me through beech woods.  The trees have not yet shed their leaves and the canopy is dense, few plants grow in their shadow. The thick fog had reduced the light and entering the darkness of the woods seemed foolhardy.  But my courage was rewarded, because as I started to emerge into open fields the silhouette of trees and walls was breathtaking.

Working with pigment ink pens in a Pointellist style seems to capture the ethereal nature of the day and the subject.  Although the Autumnal colours were present in the woods, the stark contrast of fog with the dark trees made me choose to work in a palette of greys. 


Sunday, 13 October 2013

Working on the fly


It's been a crazy few weeks with little time for art and experimentation.  I took photos of some fly agaric mushrooms (Amanita muscaria) that I recently found in local woods and I've been mulling over what to do with them. I'm drawn to these brightly coloured fungi; there's something so exotic about their luscious, bright red-and-white spotted caps.  But they come with an air of danger too - they're hallucinogenic, and this made me think of some kind of manipulation technique.

The textile designer, Lucienne Day liked to cut up coloured pieces of paper to create abstract images so this seemed like a good place to start.  I have long admired her work, especially her ability to reduce a botanical drawing to its simplest form. 

I trimmed my photo to isolate the red cap of the fungus and then continued to cut it into 1cm strips.  I used the remaining trimmings to make similar strips that I wove in a warp direction.

Although simple, the weave pattern acts as a view-finder for different parts of the image. I noticed that the spots are not at all symmetrical; they have ragged edges and appear to be bursting through the bright red cap.  The whole effect is distorted and perhaps this would be a view of the world if you were to try eating one of these fairy toadstools.  I think I'll keep them safely on paper! 

Monday, 7 October 2013

New Media


This week has been all about exploring different media.  My first diversion was ceramics. I popped into a lovely local cafe Cobbles and Clay to paint a plate that will be given to the winner of a Bake Off style competition that I'm organising on Saturday 12th October.  The paints that I used behaved very differently to acrylics or watercolours - they are viscous, slightly dry and are absorbed very quickly by the plate.  On the up-side, if you make a mistake, it's easily removed with a damp cloth.  I have to own up to several revisions because I wasn't happy with the lettering.  

My other foray into the unknown was an upholstery taster course run by Pauline Keenoy at Damside Mill which was part of the South Pennines Making and Doing Festival.  I took along an old chair and discovered that it was rather beautiful underneath its layers of varnish and 1950s moquette.  I have got great plans for it!  I am starting a course in November to learn the skills necessary to complete its transformation. 

Sunday, 29 September 2013

Family matters


I had an unexpected visit from the Partridge Family this week.  Those of us of a certain age will remember a popular children's TV programme but it was actually a visit from a dozen or more little birds.  They pecked and poked their way around my patio looking for seeds and other tasty morsels and then, just as soon as they arrived, they had gone. If I hadn't been walking past the window at that precise time I would never have known they had called. 

They are chubby little birds and quite inquisitive. Their plumage is beautifully marked in shades of blue/grey and brown.  I snapped a few photos before they left and now I have been trying to draw them. I started with water-colour pencils but I found them too abrasive for the soft linen paper of my sketch book so I reverted to my usual choice of ink pen and paint. 

I'm thinking of reworking the drawing in the style of Nicola Javis as seen in the July/August issue of Embroidery magazine but that will be next weeks project. 

Sunday, 22 September 2013

Love letters


Yesterday was my wedding anniversary. Finding the right present is always a tricky business so I went for a quirky personalised approach. I'd found an old mill bobbin wound with coloured string in the fabulous Imaginarium Gallery in Haworth but wasn't quite sure what I would do with it.

I've been using different typefaces in another project so decided to draw letters on small pieces of cartridge paper spelling out the word Anniversary. On the reverse side of each card I have written a short love letter.  I threaded the cards onto the bobbin string and hey presto! instant gift. Just a little imagination and a lot of love.

Sunday, 15 September 2013

Fruits of my labours

More dabbling with devore this week. I led a mini-workshop as a taster session for my friends and to help me plan for a full-blown affair next month.

This technique requires a special kind of mixed fibre cloth. Silk-viscose velvet is the most common but I also use satin and georgette versions to great effect.  Chemicals are used to burn away cellulosic fibres (viscose in this case but it attacks cotton and linen too) leaving the silk mesh behind. You can play around with the chemical reactions and create a resist by applying alkaline dyes first so that when you print or paint over with (acidic) devore paste, one will neutralise the other.  Sounds like a chemistry lesson doesn't it?  

I like the fact that you have to think and plan carefully to achieve the effect you want.  It requires some mental gymnastics because the places where the devore paste is applied will be eaten away so often the design needs to be reversed.

My photos show this week's sample which was inspired by the rich crop of blackberries that adorn the walls and hedgerows of my walks.  I printed blackberry shapes first and then painted a tangle of briars in a vibrant rust colour.  Next I applied the devore paste with a brush, working freehand in loose leafy shapes.  Once I had activated the paste and removed the cellulose fibres I painted the background with a mixture of Autumn colours. The viscose fibres absorb less of the dye leaving a silvery shimmer to the pile.  Mist and mellow fruitfulness! 

Saturday, 7 September 2013

A need to communicate


That's what it's all about isn't?  A need to communicate, to tell the World about what we are doing.  That's why I'm writing this blog.  Well here is a tale of a story....

For the last three months, I've been involved in a project initiated by Skipton Puppet Festival.  The idea is to tell the story of how our local Asian community came to Skipton from Mirpur in Kashmir, Northern Pakistan using a series of textile pictures.  The project is led by artist Jackie Lunn and is being made by the Broughton Road Women's Group with support from the Embroiderer's Guild.

It's been a fascinating experience learning how the government of Pakistan offered UK work vouchers in compensation for displacing hundreds of families when the huge Mangla dam was constructed in the 1960's.  The men left their life in the fields and came to work in the carpet mills and tanneries in Yorkshire. Wives soon followed and children were born in the UK but the families keep in close contact with their relatives back in Mirpur by phone and video links.

The story cloths have been made with felted wool and hand dyed calico and we are in the process of adding details and embellishments to complete the story.  My photo shows a smart phone and a computer that I have made by layering up pieces of fabric with Bondaweb. Parveen, one of my new friends, has been busy sewing tiny buttons onto the computer.  I have added some stitches round the edge of the smart phone but I don't want to spoil the glistening surface that I had created when I added a fine layer of crystal organza fabric.

The story cloths are nearly finished so if you're in the area why not come along and see them.  They will be on display throughout the Festival which takes place from 27th-29th September 2013.

Thursday, 5 September 2013

Remembering Bracken

  
My sketch book this week has a rather melancholy feel as I remember my lovely fat cat, Bracken, who died last Friday. 

I've tried to capture the stripes and swirls and spots of his coat but its difficult to recreate nature's patterns in simple watercolours. I've added some splashes around the background because I wanted to give a lived-in appearance.

Mr Beebs, as he was affectionately known, did not do much except eat and sleep and this probably contributed to his untimely death. His favourite place was on the back of the sofa and he managed to squash the cushions down to create a kind of hammock. But if there was a shaft of sunshine anywhere in the house then it was a safe bet that he would find it, stretching out to his full length and exposing his gloriously spotted tum.  This is how I will remember him.

Sunday, 25 August 2013

Natural Selection


I have been teaching basic screen printing skills this week. Nothing too complicated, just simple screens and Procion Dyes. At the end of a long day I had a few pots of dye left over and I decided to paint them onto a piece of cotton.

We had been using discharge paste as an alternative print medium and a small amount remained in a pot. As I waited for things to dry I wondered if it would be possible to print directly from plants. No time like the present! I nipped into the garden and gathered a handful of interesting vegetation; spindly goose grass, fragrant mint, bracken laden with spores and feathery anemone leaves.

After patting the leaves dry on absorbent paper, I brushed them with a light coating of discharge paste before pressing them gently on the cloth. For me, the joy of working with discharge paste is that you are never quite certain of the result: there is always an element of serendipity as to how much the base cloth will be bleached by its application.

I'm pleased with the results.  The purple worked best, the green was a bit too subtle, whist the blue colour discharged to a dark purple shadow. A light touch of both paste and printing pressure was all that was required and I think with a little practise it would be possible to reveal more of the leaf structure in these prints. Not bad for an idle after-thought!

Monday, 19 August 2013

Make do and mend


I've been inspired by finds from my holiday to Turkey. Everywhere I looked I saw examples of thrift but also the desire to preserve. None more so than this lovely patchwork cushion that I found in my hotel room.

It had been created from a wide variety of fabrics, Ikat woven silks that were visibly deteriorating, heavily embroidered cottons, delicate Cornelli work, Jacquard silk, pieces of plain cotton pestemel. With seemingly little thought these precious fragments had been sewn together to produce a glorious riot of colour and texture. I loved its rustic honesty.

I have returned home vowing to do the same with favourite pieces from my stash  and not try too hard to create something too harmonious or contrived.

Sunday, 4 August 2013

Travels with my Aunt

 
My sketch book this week is some simple pen and watercolour drawings which serve as an aide memoire of my annual Summer pilgrimage to visit my Mother's family in the South. 

We spend a lot of time talking, visiting other members of the family and remembering those that are no longer with us. For me it is always an opportunity to look back on carefree Summer holidays of my childhood and to  reconnect with my roots. 

This time we met new puppy Ruby and some crazy guinea fowl my cousin's farm. We remembered my Granny's birthday with a bunch of yellow freesias and indulged in a bit of designer shopping. 

Time well spent! 

Sunday, 28 July 2013

Saving Face


In a week of Royal announcements I can also say that I've created a new body!  I've just completed the second workshop with doll maker, Kathryn Thompson and here are the fruits of my labours.

Arriving with a bag of body parts and an un-stuffed head or two, the class was soon whipped into shape as we had a lot to get through.  I realised that the course was not just about making a doll but it was actually a lesson in drawing faces.  Kathryn took us through the essentials of proportion and then focussed on how to create details such as eyebrows and eye colour using her impressive collection of fine markers and colouring pencils.  Armed with this knowledge we then set about with some strong thread, a very long needle and a complicated version of dot-to-dot pictures to give the facial contours.

I have to confess to being a little scared of this doll and I think that it's because the face is too life-like, which should be a huge compliment to Kathryn.  I made two faces but opted to use a blank canvas face with only a minimum amount of shading.  My doll is a Patchwork Sprite sewing a small piece of work.  She has a skirt made from some knitted wool/wire, embellished with trimmings and tiny cotton-reel earings.

Monday, 22 July 2013

Wax lyrical


I have been a great fan of dyeing and printing since I realised that it would free me up from all my self-imposed constraints of neatness and perfection.  Last week I had my first foray into Batik and I discovered that there is a whole new level of serendipity with this technique!

For the uninitiated, Batik is a Javanese method of wax resist dyeing involving hot wax and a small metal funnel called a tjanting which is used to apply the wax to cloth.  After a quick practice with the tool on a piece of rough paper I thought I had got the measure of a tjanting.  With my white cotton fabric stretched over a frame I started to work in what I thought were loose and artistic swirls.  But the combination of absorbent fabric and free-flowing wax required a lot more skill than I could muster on a hot Friday morning.

The results are very primitive but the veined appearance, which is achieved by cracking the wax prior to dipping in a final bath of dark coloured dye, made my sample look like an illuminated manuscript or a stained glass window.  Unusually, I chose to work in bright colours for a change and do you know, I quite like my bold turquoise and purple cloth with highlights of yellow and green.

Saturday, 13 July 2013

Doodles


I have a bad habit of doodling, especially in meetings or when I'm talking on the phone.  This week's art is part collage, part line drawing but all very loose and relaxed - just like a doodle.

I chose New York as my subject because my daughter has just finished singing in Leeds Youth Opera's production of Carmen which was staged in Spanish Harlem.  The gritty grey and black colours of the set and costumes were punctuated with flashes of red.  These gradually increased in number as the story of love and betrayal unfolded.

As luck would have it I have reached the mid point of my sketch book and it has a lovely red cord running through it.  I started my work by laying down torn fragments of The New York Times.  Then I drew an outline of New York skyscrapers in black drawing pen.  I didn't want it to be too architectural so I kept it loose and doodle-like.  Finally I have added a crimson flower (which will be pressed and dried) which was so symbolic of Carmen's love for Don Jose.

Monday, 8 July 2013

Body of Proof


This week my work area (sadly I don't have a studio so it's just a space on the dining room table) resembles a bizarre CSI case.  There are body parts all around, a pair of haemostats, needles and a monumentally big bag of stuffing!  The truth is I've been learning how to make art dolls with Kathryn Thompson.  These beautifully constructed bodies are a great way to display small pieces of work or samples that you don't quite know what to do with and are languishing at the bottom of your sewing box.

Kathryn is a generous teacher, sharing her skills and experience as well as a host of shopping tips.  It's been a crazy weekend and I've still got a lot of homework to do before my next class in a couple of weeks.  Now all I need is some inspiration for how to complete my little friend.

Sunday, 30 June 2013

Messages from afar


Last February one of my stitching friends left to start a new life with her family in Canada.  We have shared a love of gardens and stitching and walking.  We have traded wisdom and advice on all manner of subjects.  And we have laughed - a lot!

A group of us decided to make some bunting to decorate her new home and so we each made a flag in zingy lime green and pretty patterned fabrics.  They are rectangular in shape and more like a Tibetan prayer flag than your usual bunting.

Here is my flag with appliqued dogs depicting our furry companions and some stitches representing our walks.  On the reverse side is not only some lovely fabric but a little message to wish her well.


Sunday, 23 June 2013

Creature Comforts


I belong to the Embroiderer's Guild and my local branch is going to exhibit work at Holy Trinity Church, Skipton at their flower festival which takes place over the August Bank holiday.  The theme is Noah's Ark and members have been asked to make a cushion with this in mind.  Work will be sold for the benefit of Martin House Hospice, a special place in Boston Spa which cares for children with life limiting diseases.

With all these thoughts in my head, I chose a koala.  These lovable (but somewhat grumpy) animals have a special place in my heart because it was a small purple toy koala that was my youngest daughter's favourite comforter.   Known in our house as Gaga, the purple one has traveled all over with us and has been the object of many a midnight search!  I drew my design on tracing paper and then, working on the reverse side, I machine embroidered a grey printed fabric, gradually building up the outline of the animal.  I added a dark purple nose as a nod to our beloved Gaga.

I like the way that the fabric frays slightly, softening the edge and giving a kind of furry appearance.  The leafy-green background fabric is not quite a eucalyptus tree but it is nicely verdant.

I hope that my cushion will be treasured by someone and that between us, the Embroiderer's Guild will raise money for a very worthwhile cause.

Monday, 17 June 2013

Just One Stitch


Just one stitch is a favourite challenge for the Embroiderer's Guild and it's a great way to explore the versatility and experiment with different yarns.  My sewing friends found that we had an unexpected change of plan for our group last Friday and at short notice, this was what we decided to do.

The stitch in question is Sorbello and it can be made to look fantastically different.  In it's tightest form you get a lovely square knot, but extend the stitch and you get large crosses.

I wanted to base mine on my cherry blossom study from last week.  I started by laying down a branch in thick tweedy wool using a very tight stitch.  Then I chose some thick pink knitting yarn that was originally bought to make felted slippers.  I made the legs of the stitch extra long to produce really big stars.  I overlayed these stitches with ones made using pink variegated sari ribbon purchased from a recent trip to Texere Yarns.  Finally I added some much smaller stitches using lime green chenille knitting yarn to accent the flowers.

The most interesting thing about our day was just how varied everyone's work turned out to be when we were all using just one stitch.

Sunday, 9 June 2013

Turning Japanese


I'm celebrating the arrival of the cherry blossom!  It's over two weeks late and probably the last to flower in the country because I live high up on the Pennine hills.

Cherry blossom is central to Japanese culture and it's arrival is eagerly awaited as a herald of warmer weather. It is the custom to picnic underneath the billowing clouds of blossom.

My tree is only a small one but it's flowers are just as welcome. I've created my own homage to the lovely confetti-like petals using magazine pictures to give tonal variations.


Sunday, 2 June 2013

Supersize me!


I went out with some creative friends on Saturday, and over lunch we were talking about how difficult it was to loosen up from detailed stitching or drawing.  "Go large" was the advice from my friend Claire!  Now she knows a thing or two about getting out of your comfort zone and trying to do things differently.  She leads classes and workshops for community groups and she likes to set a challenge.

So I set about with an A2 sheet of paper and a very large lump of charcoal and started drawing my gnarly old tree root.  I tried again with a large nib graphic felt tip pen.


I used a continuous line method where I tried not to take the mark-making tool off the paper.  The results have a more fluid feel about them but are best viewed from a distance :)
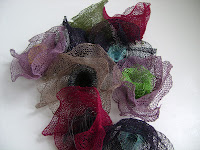
I think I might isolate some elements of the drawing and use these as the basis for some pattern design.

As for Claire, I'm going to invite her to give a workshop for the Embroiderer's Guild so that she can pass on some more wise words.


Sunday, 26 May 2013

Studies from my sketchbook


I found this lovely gnarly old root on a rather wet walk with my dog a week ago.  When I saw it on the ground, the colours just glowed in the early morning light and I could see all the fine lines of stretched and distorted wood filaments.  As it dried out in the kitchen it started to loose colour, finally taking on the bleached patina and appearance of an animal skull.  A quick lick of oil soon restored the rich colours and texture!

I have been looking at it all week, studying the knots, whorls and lines.  I dreamed of a highly textured painting in acrylic or a collage.  But I don't think I'm a dedicated painter (or sketcher for that matter).  I'm looking for quick results and when my work doesn't turn out how I want, I abandon it for something new.  It's hard doing this kind of visual research and yet I know it pays dividends.  As I was trying to interpret what I saw it made me think of a Munch painting.  Is something screaming to get out?

I think this small lump of timber has a story to tell.

Monday, 20 May 2013

Sunday Workshop


Yesterday I spent the afternoon at Gawthorpe Hall, home of a fabulous collection of textiles amassed by Rachel B Kay Shuttleworth, where I was teaching a workshop on knitted wire jewellery.  The ladies who joined me around the library table had a wealth of experience: fashion textiles, dress design, sewing, beading, knitting and all kinds of craft but everyone came to the workshop to try something new.  

Knitting with wire is a special kind of alchemy.  The wire is slippery and not at all stretchy so it takes a while to get used to handling it.  When you start knitting it looks like a spider's web made by a very drunk spider!  But keep the faith, follow the pattern, and with gentle manipulation of the knitting you will find that beautiful lacey shapes appear.  I had designed these lovely fuchsia earrings for the course, the vibrant red and purples look great together.  By the end of the afternoon we had a selection of earrings and bracelets to take home.

I have also gone back to my knitting machine this week to make some more rose brooches using stainless steel and wool yarn sourced from Habu Textiles.  I just love using this yarn, it's so soft and yet the wire core means that it keeps the open knit structure and shape.  These corsages are perfect for a wedding outfit or to customise a hat.


Sunday, 12 May 2013

New Tricks


There is a saying that you "learn something new everyday", well last Friday I learned quite a few new things.  Jacobean style crewel work was the order of the day for me and my lovely sewing friends, with Viv leading the session and Marjorie contributing a wealth of books on the subject.  It wouldn't have been my first choice but it has a surprising charm in its simplicity.

We started by practising the basic stitches on a piece of calico and this was where I learned my first trick.  I discovered that crewel wool (and probably other wool for that matter) must be used in the correct direction:  if you run your fingers down the length of the wool it should feel smooth in one direction and rough in the other.  When you thread a needle the wool should be pulled through the cloth in the smooth direction.  Clever eh?

The stitches are fairly common place, stem stitch, chain stitch, seed stitch, French knots and a new one for me, split stitch which produces a very fine chain effect.  But by using wool, the overall effect is of more substantial cloth rather than merely decorative (it's also more forgiving!)

I chose a stylised daffodil motif that looked quite contemporary but was actually taken from a 16th Century design.  I drew it onto a coarse linen fabric and then worked the outline with a mixture of green wools.  Outlines in stem stitch or split stitch for the finer curves.  Infilled with seed stitch and French knots.  Chain and split stitch for the stem.

I can't say that I'll be decorating my curtains with crewel work but it's definitely something that I will try again

Monday, 6 May 2013

Old School Printing


Last year I visited the Country Living Christmas fair at Harrogate where I met artist Julia Burns.  Her work is stunning - beautiful pictures of farmyard and country animals.  I bought a print of a pair of pheasants as a present for my husband.  But I was absolutely astounded to learn that all her work is created using potato prints.

Like most people, I thought potato prints were strictly for children but I'm revising my opinion of this humble method of creating patterns and pictures.  This morning I armed myself with a small potato, a craft knife and an old metal skewer and made these prints of the fritillaries that grow in my garden.

Sunday, 28 April 2013

Spring Greens


Last week's little project was a felted bangle devised by my friend Jan.  It's made on a framework of knitted wire tube and then needle felted to secure the fibres.

I was beguiled by the vibrant colour of green silk noil which gave an interesting texture but was a bit of devil to work with and turned out to be a tough match for the normally barbarous felting needles.  The other members of our crafting group had more sensibly chosen merino wool tops which gave a much smoother and altogether more polished appearance.  I finished it with some antique coloured beads stitched on in small clusters.

I'm pretty pleased with myself this week as my contemporary quilt/wall hanging Two Views of Withens was selected for the Yorkshire and Lancashire Craft Open and is currently on display at the Platform Gallery in Clitheroe.  I'm also running another knitting workshop for Gawthorpe Hall on Sunday 19th May.  Booking is via the Eventbrite website if you want to check it out.


Monday, 22 April 2013

This Time Last Week

This time last week (well Sunday to be precise but I'm a bit late with my blog post) I was basking in the Spring sunshine in Paris with my friends.  We sat close to this brasserie eating a late lunch and were serenaded by a busker playing a piano on the street.  I had eaten much better food during our weekend jaunt but the setting was perfect.

Here is my pen and ink sketch of the block that resembled the "Flat Iron" building in New York. The clear blue April skies are reflected in the windows and the plane trees have not yet sprouted leaves to cast shadows over the stonework.  I wonder what the views are like from the top most floors?

Monday, 15 April 2013

Favourite things


I've been working on a collage.  A mixture of fabrics, found objects, items that I have made and loved and not quite known what to do with them.  I've worked them up into a collage on the theme of favourite things.
Here's a little bit: hand dyed cotton organdie and silk, cotton lace bought from a French man at the Knit and Stitch show, a paper tree cut from a damaged book.  Every piece with a memory or a story to tell.

Monday, 8 April 2013

Gorgeous gifts


My creativity has been channeled into producing birthday gifts so I'm afraid not much time for art and blogging.  

Here are a couple of cushions that I've made for my friend's daughters who are 18 on Wednesday.  They have been reverse machine embroidered onto linen fabric using patchwork cottons and viscose threads for a bit of shine! They are finished with mismatched buttons on the reverse.

Monday, 1 April 2013

Goldcrest in my garden


Although there is still a lot of snow on the ground but the birds in the garden know that spring is on its way.  Last week a goldcrest was spotted in amongst the shrubs.  This tiny bird is smaller than a wren and has a distinctive gold flash on the top of its head.

I did a few studies in my sketch book using ink pen and water colours.  Then I started to think about how I might translate the picture into stitch and I remembered that in a workshop taught by Naseem Darbey, we had used wire as a drawing tool.  Its a clever device because it focuses the mind on capturing the essential features and creating a continuous line drawing with a length of wire requires a forethought and ingenuity. I used 0.3mm coloured copper wire in sage green bought as part of a sample pack from The Crazy Wire Company.

Sunday, 24 March 2013

Ssh its a secret!

March, April and May are months filled with birthdays and some pretty special ones at that!  I've turned my creative thoughts to finding lovely presents.  Some of them will need to be tracked down and bought so I will be scouring local shops for bits and pieces.  But some require a bit more ingenuity.

Today's page in my sketch book has been with a map of my thoughts with scribbles, doodles and little pictures drawn in ink pen, tinted here and there with gentle water-colours.  I find that it helps me to organise my ideas and hopefully, very soon, they will coalesce into a fully formed plan.

You'll have to wait and see what comes out but in the meantime here is a picture taken by my daughter Frances for her A level art coursework.  Its a collection of scissors and upholstery implements that I have inherited from my family.  Heirlooms of a sort, each with their own story to tell.

Sunday, 17 March 2013

Burnt offerings

This week I have been busy in my kitchen chemistry lab.  With dyes and bleaches and devore paste I have been applying myself to some silk viscose velvet and georgette.  Its a long process and the joy for me is not knowing quite what will emerge.

Sadly what appeared after the final session with a hot iron this afternoon was burnt offerings - I had been too heavy handed with the devore paste which was a shame because I ran out of it half way through.  Perhaps that was my downfall, in trying to use up every last bit, I did too many passes though the silk screen.  A lesson learned.

But there is never a mistake in textile art, only an opportunity to do something differently.  So I will wait for my fabric to dry and I will iron it and look at it with fresh eyes to see what I can make of it.


Sunday, 10 March 2013

Lessons learned

I like learning how to use new materials, so when a friend suggested that we should try a tutorial by Jean Littlejohn from Stitch magazine it seemed an ideal opportunity to experiment.

We started by applying a metal transfer foil over most of the fabric surface.  I didn't like the heavy gold "brocade" look of the sample in the magazine so I chose copper on a bright green chenille upholstery cloth.  Then I started to build up texture, working with bold stitches and using thick knitting yarns of green, purple and cream wool.  So far, so good.

Next came the interesting bit: I applied a second piece of copper coloured transfer foil over the whole work.  At first it seemed to obliterate everything but when I ironed on a layer of green crystal organza, the copper surface started to break down and the coloured yarns reappeared.

Finally I added some simple stitches in fine green wire (I had been knitting with it and it just happened to be on the table at the time!) and space dyed cotton in shades of blue and green.  These helped to define the texture and it gave the sample a quilted appearance.

The end result showed potential but for my taste, I found that transfer foil is a bit of a thug, covering everything in its path, although I have seen it used to great effect to lift and highlight elements of tapestry and embroidery.  I liked the layers of stitch and cloth but would have preferred to see more of them rather than lumps under a uniform copper blanket.

This project took me out of my comfort zone and given me ideas for how I might use metallic transfer foils in the future but it will definitely be with a much lighter touch!

Sunday, 3 March 2013

Miniature Shoes


I spent yesterday in the delightful company of Serena Partridge and the ladies of my local Embroiderer's Guild, learning how to make miniature paper shoes. It was a day of make-believe and fantasy, allowing all who took part, the opportunity to escape from everyday life and to indulge in some creative therapy.  We snipped  and stuck, teased and embellished, pairs of tiny shoes.

Serena's work is breathtaking.  Her playful inventiveness has created whole wardrobes of accessories: not just shoes but gloves, stockings and hats.  Her stitching and embellishment is wonderful to see and I felt particularly privileged to be able to study her work without the usual barriers imposed by exhibitions.  Serena is generous too with both her time and her sharing her techniques.  She has delivered this workshop many times and yet Serena still retains genuine enthusiasm for what her pupils make.

Sunday, 24 February 2013

Stitched art


Sometimes what I like about stitching is you can let your mind wander whilst your hands are busy, but machine stitched pictures like my tulips here, require a bit of thought.  You have to plan carefully and consider how each of the layers in the picture will be built up:

I started by couching the stalks with green chenille knitting yarn, then I drew the glass vase with ecru viscose thread, shading the sides with arcing lines of stitch.  Next came leaves of green crystal organza and for some, I used two layers of fabric to give density and a deeper colour.  Then I added purple and white tulips - rich silk and sage coloured viscose thread. Finally I drew the delicate Paperwhite narcissi with star-shaped stitches.

It's not quite finished - I might work into the narcissi some more as they don't stand out as much as I would like, but I thought I'd show you what I've done so far.  I've translated my pastel drawing into stitch!

Sunday, 17 February 2013

Pastel Heaven


Last week my lovely husband gave me a rainbow box of Caran d'Ache pastel pencils for my birthday.  We had spotted them in Geneva airport a few weeks ago and he had obviously noticed my wistful looks.  Like the good hunter gatherer that he is, he tracked down the local suppliers but found that the object of my desire was not available yet in the UK.  Thankfully he is very persistent and now I'm the proud owner of a set of 84 glorious pastel pencils!

Pastels are good for me, they make my drawing loose and bold.  I chose to draw a vase of purple and white tulips with some fragrant Paperwhite narcissi.  The languid leaves and stems lend themselves to my style of work.  I would like to see if I could translate this into stitch - maybe this will be next week's project.