This week I have been busy in my kitchen chemistry lab. With dyes and bleaches and devore paste I have been applying myself to some silk viscose velvet and georgette. Its a long process and the joy for me is not knowing quite what will emerge.
Sadly what appeared after the final session with a hot iron this afternoon was burnt offerings - I had been too heavy handed with the devore paste which was a shame because I ran out of it half way through. Perhaps that was my downfall, in trying to use up every last bit, I did too many passes though the silk screen. A lesson learned.
But there is never a mistake in textile art, only an opportunity to do something differently. So I will wait for my fabric to dry and I will iron it and look at it with fresh eyes to see what I can make of it.
Sunday, 17 March 2013
Sunday, 10 March 2013
Lessons learned
I like learning how to use new materials, so when a friend suggested that we should try a tutorial by Jean Littlejohn from Stitch magazine it seemed an ideal opportunity to experiment.
We started by applying a metal transfer foil over most of the fabric surface. I didn't like the heavy gold "brocade" look of the sample in the magazine so I chose copper on a bright green chenille upholstery cloth. Then I started to build up texture, working with bold stitches and using thick knitting yarns of green, purple and cream wool. So far, so good.
Next came the interesting bit: I applied a second piece of copper coloured transfer foil over the whole work. At first it seemed to obliterate everything but when I ironed on a layer of green crystal organza, the copper surface started to break down and the coloured yarns reappeared.
Finally I added some simple stitches in fine green wire (I had been knitting with it and it just happened to be on the table at the time!) and space dyed cotton in shades of blue and green. These helped to define the texture and it gave the sample a quilted appearance.
The end result showed potential but for my taste, I found that transfer foil is a bit of a thug, covering everything in its path, although I have seen it used to great effect to lift and highlight elements of tapestry and embroidery. I liked the layers of stitch and cloth but would have preferred to see more of them rather than lumps under a uniform copper blanket.
This project took me out of my comfort zone and given me ideas for how I might use metallic transfer foils in the future but it will definitely be with a much lighter touch!
We started by applying a metal transfer foil over most of the fabric surface. I didn't like the heavy gold "brocade" look of the sample in the magazine so I chose copper on a bright green chenille upholstery cloth. Then I started to build up texture, working with bold stitches and using thick knitting yarns of green, purple and cream wool. So far, so good.
Next came the interesting bit: I applied a second piece of copper coloured transfer foil over the whole work. At first it seemed to obliterate everything but when I ironed on a layer of green crystal organza, the copper surface started to break down and the coloured yarns reappeared.
Finally I added some simple stitches in fine green wire (I had been knitting with it and it just happened to be on the table at the time!) and space dyed cotton in shades of blue and green. These helped to define the texture and it gave the sample a quilted appearance.
The end result showed potential but for my taste, I found that transfer foil is a bit of a thug, covering everything in its path, although I have seen it used to great effect to lift and highlight elements of tapestry and embroidery. I liked the layers of stitch and cloth but would have preferred to see more of them rather than lumps under a uniform copper blanket.
This project took me out of my comfort zone and given me ideas for how I might use metallic transfer foils in the future but it will definitely be with a much lighter touch!
Sunday, 3 March 2013
Miniature Shoes
Serena's work is breathtaking. Her playful inventiveness has created whole wardrobes of accessories: not just shoes but gloves, stockings and hats. Her stitching and embellishment is wonderful to see and I felt particularly privileged to be able to study her work without the usual barriers imposed by exhibitions. Serena is generous too with both her time and her sharing her techniques. She has delivered this workshop many times and yet Serena still retains genuine enthusiasm for what her pupils make.
Sunday, 24 February 2013
Stitched art
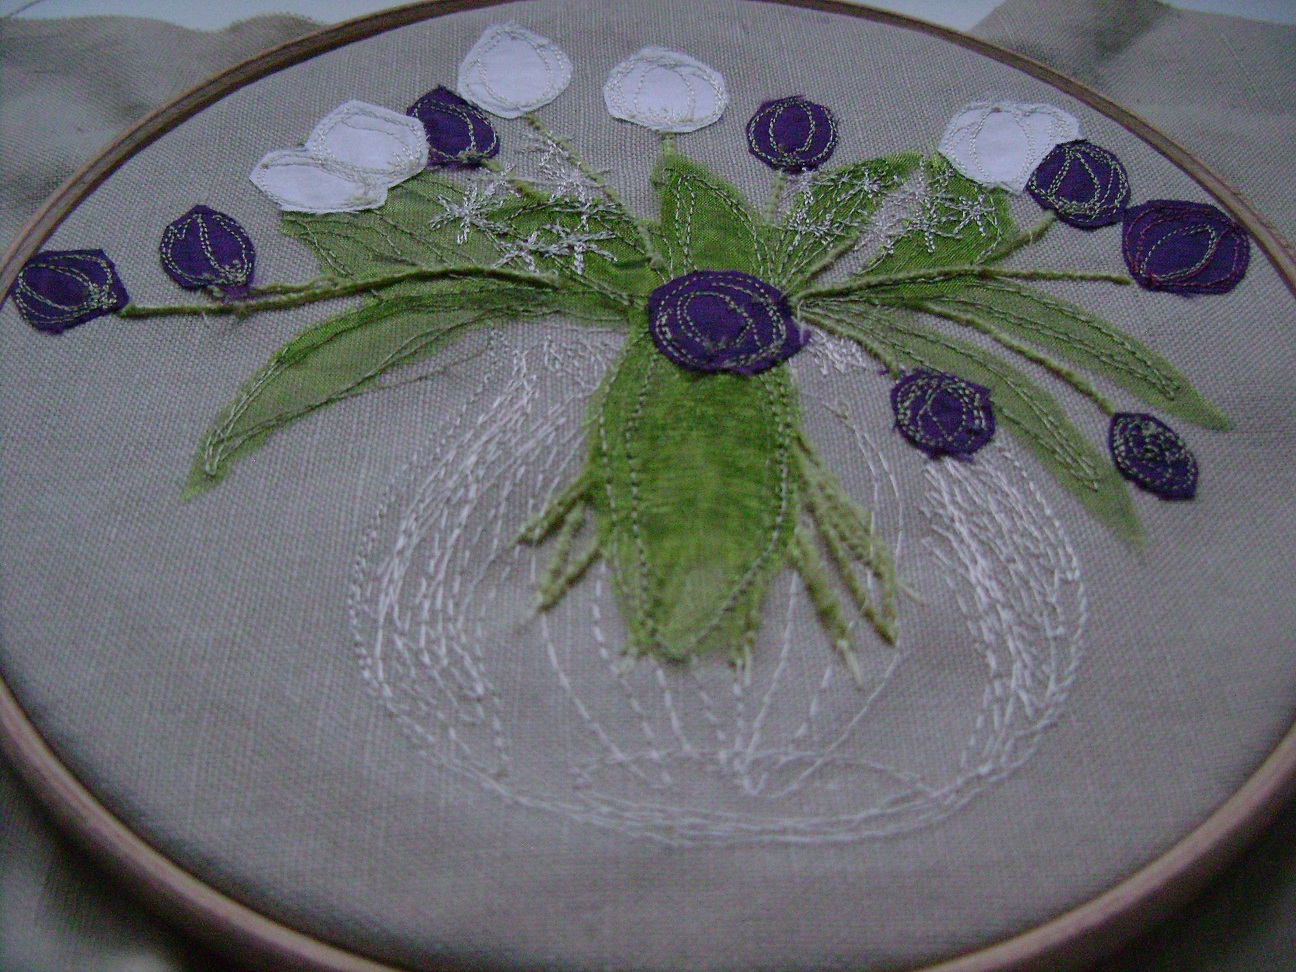
Sometimes what I like about stitching is you can let your mind wander whilst your hands are busy, but machine stitched pictures like my tulips here, require a bit of thought. You have to plan carefully and consider how each of the layers in the picture will be built up:
I started by couching the stalks with green chenille knitting yarn, then I drew the glass vase with ecru viscose thread, shading the sides with arcing lines of stitch. Next came leaves of green crystal organza and for some, I used two layers of fabric to give density and a deeper colour. Then I added purple and white tulips - rich silk and sage coloured viscose thread. Finally I drew the delicate Paperwhite narcissi with star-shaped stitches.
It's not quite finished - I might work into the narcissi some more as they don't stand out as much as I would like, but I thought I'd show you what I've done so far. I've translated my pastel drawing into stitch!
Sunday, 17 February 2013
Pastel Heaven
Pastels are good for me, they make my drawing loose and bold. I chose to draw a vase of purple and white tulips with some fragrant Paperwhite narcissi. The languid leaves and stems lend themselves to my style of work. I would like to see if I could translate this into stitch - maybe this will be next week's project.
Sunday, 10 February 2013
Slow Craft
This quilt has been a long time coming! I first saw a quilt made of squares of old silk about 20 years ago in a homes & interiors magazine and always wanted to make something similar. When we redecorated our bedroom (about 5 years ago now) I bought a remnant of silk that matched the wall paper thinking I would make some cushions. When I realised that it quite a big piece of fabric my thoughts turned to a quilt and I purchased some grey slubbed silk to complete it. But the more I thought about it, I couldn't get a design that worked and so it languished in my stash for a bit longer.
Over the last couple of years I have used silk in my wall hangings and have got more comfortable using this somewhat tricky fabric so last May I took a rotary cutter to my collection of silk fabrics and made squares and a pattern diagram but could quite start sewing....It was late summer before I managed to machine the silk layer, September when I bought the backing fabric and January 2013 when I eventually sewed it all together. For the last few weeks I have been hand-stitching round all the flowers.

And now this week I have finished. Happy birthday to me!
Sunday, 3 February 2013
Handmade gifts
I'm hoping to spread a little happiness with these sewing kits that I made on Friday. I'm giving them to two of my friends; one as a memento because she is leaving our community, the other is a birthday present. These are small gifts but I know they will be used and cherished.
I love the challenge of making something new: working out how it will fit together, where to make seams so that all the raw edges are hidden, adding little details. I have fashioned a closed pocket for sewing threads and buttons and a padded one for scissors that can double-up as a pin cushion. The quilted heart embellishment on the front flap lends itself to needles. Just enough space to take a few bits when you're out and about.
I might be going slightly off my original intention of 50 new pieces of art. They might not be high art but they are beautiful craft.
Subscribe to:
Posts (Atom)